

One of the most important jobs you can do when you have a website is to back it up. But how exactly do you do that. If your website is built on the WordPress platform, there are plenty of options (maybe too many).
We are going to take a look at using a plugin called UpDraftPlus to back up your WordPress website. This plugin is very simple to set up. It also allows you to automate the process of backing up your website. I’ll walk you through the steps of installing the plugin, connecting it to external storage (in this case Dropbox), running a manual backup, automating backups on a schedule and finally what to do when you need to restore your backups.
Installing UpDraft Plus
Logging into WordPress
The first thing you are going to have to do is to log in to your website. In most cases, it’s just a case of adding /wp-admin on to the end of your domain.
eg; https://mywebsite/wp-admin
In some cases, the login domain gets changed (usually to slow down brute force attacks). So, check with whoever maintains your website if this is the case.
Installing and activating UpDraft Plus
Once you’ve logged in, you will want to head over to plugins. You’ll see plugins in the sidebar. Hover over this and click add new.
Now you will see a list of recommended plugins along with a search bar. In the search bar, type in UpDraftPlus. You should see the recommended plugins change to a new list of plugins that relate to your search term. Find UpDraft Plus from the list and click install. After a few seconds, install will turn into activate. Click Activate.


Connecting your backups to Dropbox
Now, you have successfully installed UpDraftPlus onto your website. The next step is to head over to the settings and run your first backup.
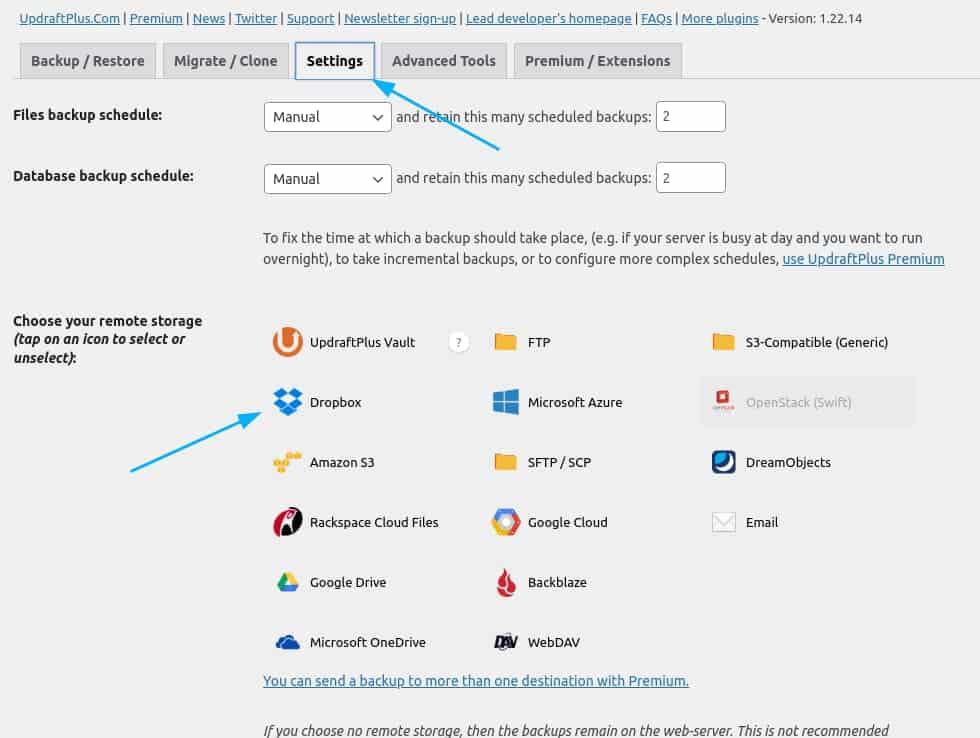
Head to the settings menu and click UpDraftPlus Backups. Before we run our first backup, we will need to connect this up to where we want to save our files. Go to settings. You’ll see a list of different storage providers. You are welcome to choose whichever storage provider you want.
If you’re not sure about which one to choose, an easy option to start with is Dropbox. If you haven’t got a Dropbox account, you can set up a free one here.
Click on Dropbox. This will reveal a list of options for setting up your backup’s with Dropbox.


Authenticating Dropbox
We will first need to authenticate our Dropbox account. To do this, find the section that says Authenticate with Dropbox and click the link. This will take you to a login screen where you can sign in to your Dropbox account and authenticate UpDraftPlus to use your account to back up your WordPress website. After you’ve finished these steps, you’ll end up back at your website.
Manually back up your WordPress website
Now that we have a place to store our backup files, let’s manually back up your WordPress website. You’ll see a big backup now button. Clicking this will bring up a set of new checkboxes. The first is asking if you want to include the database in your backup (you do) make sure it’s ticked. The second is asking if you want to include your files in your backup, and again you do, so tick that (if it isn’t already).


After that, click backup now. Great, now your site will start backing up to Dropbox. Depending on the size of your site, this can take some time.
Once it’s complete, you’ll be alerted to say that it’s finished, and you’ll now see your new backup in a list of existing backups. From there you can choose to Restore, Delete or view the log of the backup. You can also download individual parts of the backup (database, media etc) if needed.
Automating your backups
Next, we are going to look at how to automatically back up your WordPress website. The process. Head to settings and you’ll see at the top there are options to schedule both the files and the database backups.
Choose how often you’d like to back up your site. If you make a lot of updates to your site, you may want to update more often. Otherwise, select a less frequent period to save space on your storage account.
You can also choose how many backups to retain. Setting this as a higher number means you have more options for recovery when things go wrong, but it also means that more space is being taken up on your storage. Scroll down to the bottom and click save changes.

Restoring your site when things go wrong.
Great, now your site is backed up and scheduled. So, what happens when something goes wrong? Well, that depends on how wrong things went. If you are still able to log in to the site, you can navigate back to the UpDraftPlus settings and click on Restore on one of the existing backups. This is a super simple fix that will leave you feeling like an expert.
But, what if you can’t log in? Well, that’s where you might need some help from the professionals. Your website backup may need to be restored by whoever built or is hosting your site. Whoever, you get to fix this, will need access to your site’s files and possibly the database. Files can be accessed via FTP, SFTP or SSH. If these are unfamiliar terms, ask whoever is hosting your site.
Getting help with these issues is going to cost you some money. However, it’s going to be a heck of a lot cheaper because you have a backup for them to use. This makes restoring your website a breeze. This would save hours of work in most cases.